Tornado Wicks - The Making Of
The backstory
So for a while I’ve been researching into making some new fire poi heads to replace my HoP 90mm monkeyfist heads that I got from Alien Jon.
The monkeys are great but they’re heavy and because they’re spherical, they tend to smack into one another frequently which annoys me somewhat. Added to which, they have a massive I-bolt embedded in the core and the eyelet of the bolt is absolutely enormous – about 30mm across. It makes for painful wrist wraps and spirals.

So I set out to find alternative designs. Initially, I was looking at buying some Isis heads from Salza.se to replace mine but at £90.00 odd a pair plus shipping, I changed my mind. Salza make great-quality gear but I can’t afford to buy and ship a set of poi heads for ~£100.
I tried making some Isis heads myself as I found how to make them on YouTube. The first prototype was made from ordinary jute rope and worked reasonably well, but price per metre for kevlar rope was too high to make that a viable option.
I came across another design on https://www.youtube.com/watch?v=7kS2dNjuajQ again which looks more like a Moonblaze wick, but done with 4 narrow strips of Kevlar as opposed to 2 wide ones. That looked more promising as it used 8-10mm strips of kevlar wick tape. Also, by virtue of its design, it could hold itself together much better than similar wicks as tightening all the strips equally means none of them can slip much during use.
I then had a chat with Jon about the relative benefits of the different designs and he said that his moonblaze wicks were very good, but he’d love to see the “4×4 moonblaze” design. We also spoke about chain attachment strategies and how to better weight the heads. After all that, I ordered 12m of 10mm tape from firetoys and it arrived yesterday morning.
I immediately set forth to make some awesome heads and here are the results.
Manufacture

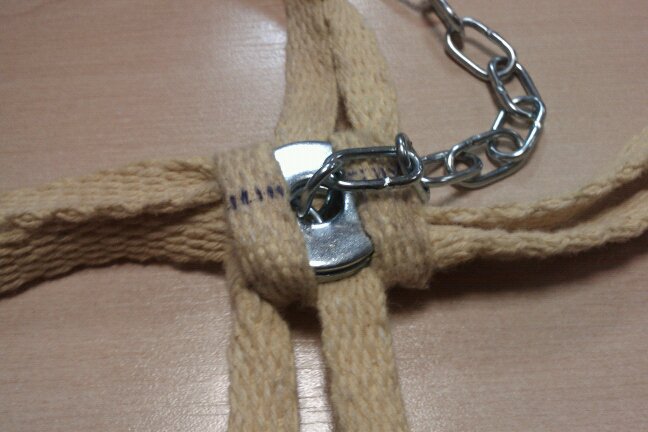
The anchor point/weight. Uses 2 40mm x 2mm washers. The 2 end chain links have been squashed slightly to allow them to fit through the hole. The end link is then widened, in my case by taking a 10mm allen key and bashing it through the hole to enlarge it. This stops the chain slipping back out through the washers.
 Embedding the anchor/weights in the first layer of weave.
 Covering the anchor with both layers of weave - horizontal and vertical to fully conceal it and prevent hot metal coming in contact with anything. After it’s in, pull all the strips tight around it.
 Completing the next layer of weave over the anchor and completely hiding it. Note that the chain pokes out through the middle of the 4x4 pattern and will remain there through the entire head. This adds weight and also means that there is no stress on the top layers of the weave as the anchor point is in the base.
 A view showing the weave in its loose state, before all strands are pulled tight.
 About 50% of the way there - notice how the spiral pattern starts to develop here!
 The final layer of weave can be done in one of 2 ways. I tried the one in the video and it sort of backfired and ended up being not that tidy at all. I suspect it’s because in the video, he was able to hide the loose ends in the middle under the triangle. I don’t have that option.
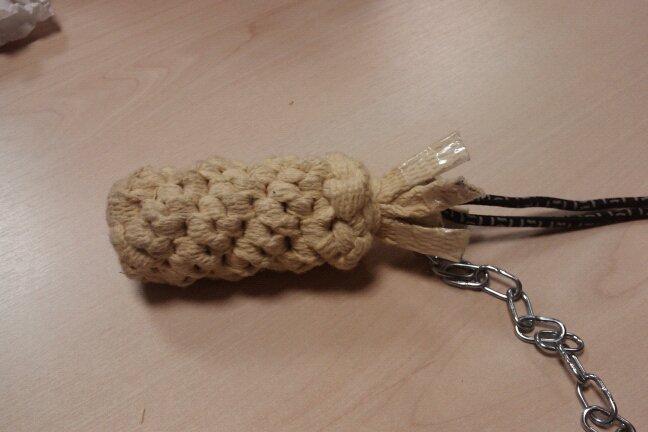
 So in the end, I finished it by doing 2 more layers of regular weave and tightening it. I’ll need to trim the excess and stitch the ends up with kevlar thread to prevent unravelling. Not that it’s likely to, for the reasons I mentioned. #### Final thoughts
As these were prototypes, I wasn’t expecting anything specific from them – expectation leads to disappointment! Overall they came out really well! As I mentioned, I like the 4×4 weave design because it means they will hold together better and the construction itself is very tight. It feels extremely solid.
Another bonus to this setup is thanks to the low-profile chain attachment point, spiral wraps mean that generally, the wick will be in contact with your hands and not the hot chain. Even IF the chain touches you, it has a tiny surface area. I may drop one of the links from the top, leaving just a single one to attach my chain to.
Saying all that, I do have some improvements in mind for the MK II design!
- The amount of kevlar used appears not to be enough. They’re slightly shorter than I expected. Next time I’m going to use four 2m strips instead of 1.5m which should do the trick!
- Also, on their own, they feel a bit on the light side – they’re very slightly lighter than my dual mass Flowlights. With fuel they’ll gain some weight though. There won’t be stability issues as the weight distribution is still biased towards the end.
- I’ll likely use four washers to weight them next time, woven between several layers so as to not damage the integrity of the things.
Happy spinning!